
Zoho Inventory update April 2025
- Email Insights for Sales Orders
- Stock Availability Filter in Stock Counts
- View and Customise Stock Status in Transactions
- Export Bin Locations Report
- Add Dropshipping Address in Sales Orders
- New & Improved Zoho Inventory Reports
- Display Type for Lookup Custom Fields
- Generate Serial Numbers in Inward Transactions
- Item Description for UPS Line Items
- Enhanced Shopify Integration
- Edit Etsy Orders
- Batch Tracking Enhancements
- Pin Columns in Transaction List Page
- Clone Delivery Challans
- Enhanced Export and Print Preferences for Reports
- Multi-Factor Authentication (MFA) for Portals
- Import Move Orders and Putaways
- Attach Documents in Purchase Receives
- Print & PDF Support for Purchase Receives
- Filter Lookup Custom Fields
- Leave Organisation Option
We’re back with exciting new enhancements in Zoho Inventory to make managing your inventory smoother than ever! This Zoho Inventory update April 2025 covers the latest features for the first quarter of 2025, and there are quite a few! Watch this space for even more updates coming soon.
Please note these updates are only the ones affecting the UK edition of Zoho Books – other region specific updates can be found in your region’s What’s New Timeline.
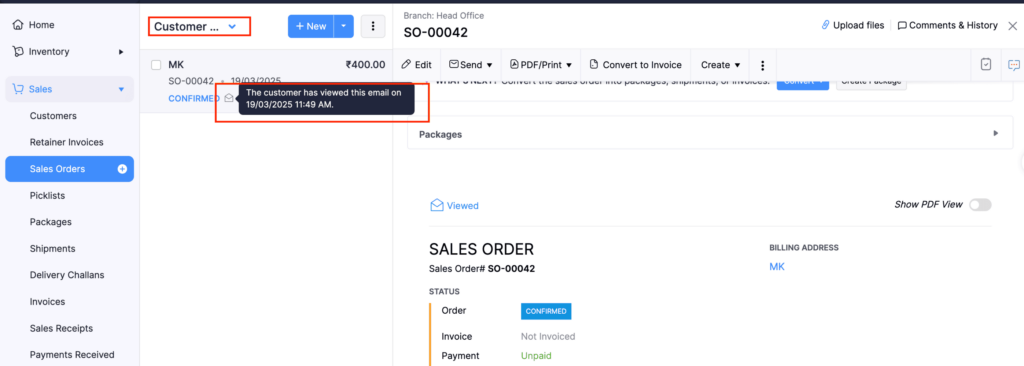
Email Insights for Sales Orders
Zoho Inventory now includes Email Insights for Sales Orders. This feature lets you track when your emails are opened and whether your clients have viewed the Sales Order.
Why It Matters for Your Business
- Gives sales teams better visibility into customer engagement
- Enables faster follow-ups based on client activity
- Helps prioritise outreach by identifying which clients are interacting with your documents
How to Use It (Fast Overview)
- Send a Sales Order via email from Zoho Inventory
- Use the ‘Client Viewed’ filter to identify which orders have been opened by the recipient
- View detailed tracking for each email under the Sales Order’s communication history Policy” section, define:
- Retry attempts (e.g., 3 tries)
- Time gap between each retry
- Maximum wait time
Goldstar’s Take
Knowing when a Sales Order email is opened can be a game-changer — it adds transparency and timeliness to your follow-up process. This is especially useful for high-volume sales teams or time-sensitive orders.
What You Should Do Next
- Start using the ‘Client Viewed’ filter in your Sales Order list
- Incorporate open tracking into your sales follow-up workflows
Stock Availability Filter in Stock Counts
A new Stock Availability Filter has been added to Stock Counts in Zoho Inventory. This lets you filter and add items based on their stock availability, streamlining the inventory counting process.
Why It Matters for Your Business
- Saves time by excluding out-of-stock or irrelevant items during counts
- Reduces manual sorting and errors in stock audits
- Helps focus counting efforts on items that actually need verification
How to Use It (Fast Overview)
- Go to Stock Counts in Zoho Inventory
- Start a new stock count or edit an existing one
- Use the Stock Availability Filter to include items based on current stock levels
- Add filtered items directly into your count list
Goldstar’s Take
This is a smart operational enhancement — especially useful for large inventories. It ensures you’re only counting what’s necessary, improving both speed and accuracy.
What You Should Do Next
- Try the new filter when setting up your next stock count
- Align warehouse teams on using this to minimise over-counting
- Use it to optimise routine and cycle counts by focusing only on in-stock items
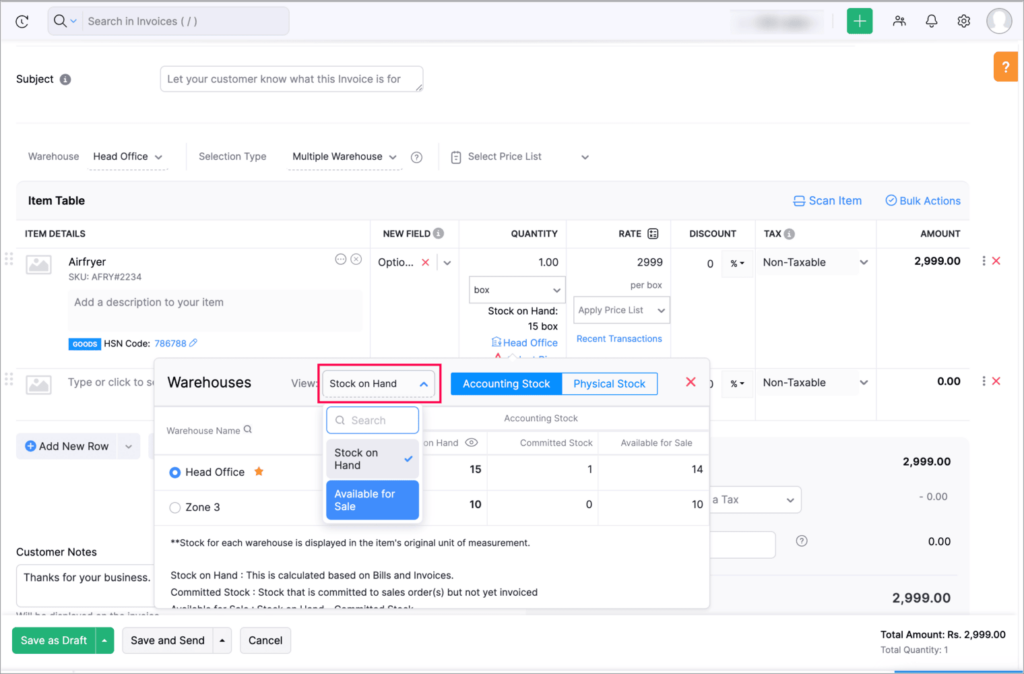
View and Customise Stock Status in Transactions
You can now view Stock on Hand and Available for Sale quantities directly when creating a transaction in Zoho Inventory. The quantity shown will adapt based on the selected View option.
Why It Matters for Your Business
- Gives real-time inventory visibility during transaction creation
- Reduces errors from overselling or stock mismanagement
- Lets teams choose the most relevant view depending on the workflow
How to Use It (Fast Overview)
- While creating a transaction (e.g., Sales Order, Invoice, etc.), select an item
- You’ll now see stock details displayed beside the item
- Use the View option to toggle between:
- Stock on Hand – total physical stock in inventory
- Available for Sale – stock minus reserved or committed quantities
Goldstar’s Take
This enhancement gives your team better insight right where it counts — inside the transaction screen. Choosing the right stock view helps prevent overpromising and supports better stock planning.
What You Should Do Next
- Check your item listings during transaction creation
- Train staff to use the appropriate View option for different sales scenarios
- Monitor which stock view works best for your process — especially during high volume periods
Export Bin Locations Report
To export a bin locations report, go to Reports > Bin Locations Details Report under Inventory
Zoho Inventory now allows you to export Bin Location reports, including the Details Report and Transaction Summary Report, in various formats such as PDF, XLS, and XLSX.
Why It Matters for Your Business
- Makes it easier to analyse and share bin-level inventory data
- Enables offline access and custom manipulation of bin reports
- Supports better decision-making in warehouse and space management
How to Use It (Fast Overview)
- Navigate to the Bin Locations report section
- Choose either:
- Bin Locations Details Report, or
- Bin Location Transaction Summary Report
- Click Export and select your desired format:
- PDF for printable records
- XLS/XLSX for spreadsheet-based analysis
Goldstar’s Take
This is especially useful for warehouse teams or operations leads looking to optimise storage and bin usage. Exporting to spreadsheets allows for deeper custom analysis and internal reporting.
What You Should Do Next
- Use PDFs for snapshot reporting or logistics documentation
- Start exporting bin-level reports for your inventory reviews
- Share XLS files with internal teams for deeper tracking and forecasting
Add Dropshipping Address in Sales Orders
Zoho Inventory now allows you to add a dropship address directly within Sales Orders. This address is tied only to the current transaction and won’t affect the customer’s saved address list.
To add a dropshipping address, go to Sales > Sales Orders, edit/create a sales order, and click + Dropshipping Address.
Why It Matters for Your Business
- Speeds up order processing for dropshipping workflowsle records for reconciliations or audits
- Simplifies handling of third-party fulfillment scenarios
- Keeps customer records clean by avoiding unnecessary address clutter
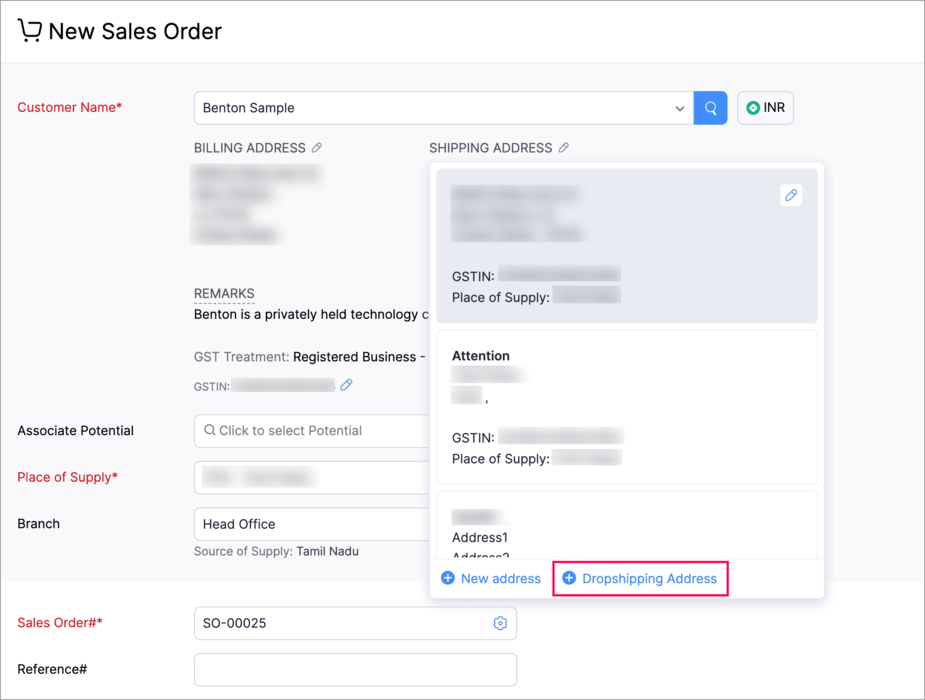
How to Use It (Fast Overview)
- Create or edit a Sales Order
- In the Shipping Address section, choose Add Dropship Address
- You can either:
- Enter a new address specific to this order, or
- Copy from an existing customer’s address
- The address will only apply to this Sales Order and won’t be saved to the customer’s profile
Goldstar’s Take
This is a much-needed win for businesses that rely on dropshipping. It adds flexibility while keeping your CRM data tidy — no more temporary addresses cluttering your main records.
What You Should Do Next
- Try the dropship address option in your next relevant Sales Order
- Inform your order fulfillment or logistics teams of this feature
- Use the copy from customer option to speed up address entry when possible
New and Improved Zoho Inventory Reports
Zoho Inventory has rolled out major upgrades across multiple inventory reports, offering better customisation, filtering, and visibility into stock and sales data. From expanded exports to new filters and revamped reports — it’s a comprehensive reporting refresh.
Why It Matters for Your Business
- Provides greater flexibility to tailor reports to your unique operational needs
- Helps identify inefficiencies, trends, and gaps across purchasing and sales
- Improves transparency and control over inventory at scale
How to Use It (Fast Overview)
Key enhancements include:
- Stock Summary Report:
- Custom reports
- New amount columns
- Stock Tracking Mode filter
- Option to exclude transfer orders
- Bulk Export:
- Export up to 500,000 records (based on your plan)
- Available for reports like Inventory Summary and FIFO Cost Lot Tracking
- Purchase Order Reports:
- New columns: Quantity Ordered, Received, In Transit, and Late By Date
- Advanced Features Across Reports:
- Custom Reports
- Show/Hide Columns
- Advanced Filters
- Supported in:
- Inventory Aging
- ABC Classification
- Committed Stock
- Product Sales
- Valuation
- Landed Cost
- Active Purchase Orders
- Sales by Item Report:
- New Report Basis filter
- Sales Return History Report (revamped):
- Status tracking
- Return reasons
- Grouping options
- Custom views
- Scheduled exports
- Inventory Valuation Summary:
- New Stock Account column
- Filtering options for enhanced segmentation
Goldstar’s Take
This is a powerhouse update for data-driven teams. Whether you’re doing in-depth stock analysis or fine-tuning procurement strategy, these report upgrades give you the control and context to make faster, smarter decisions.
What You Should Do Next
- Encourage your teams to review the new columns and filters in Purchase and Inventory reports for better planning
- Explore the new report filters and customisation tools in your most-used reports
- Set up scheduled exports to keep key stakeholders automatically updated
- Take advantage of bulk export for deeper offline analysis
Display Type for Lookup Custom Fields
Zoho Inventory now supports multiple display types for lookup custom fields. You can choose between a List View and a Dropdown View, giving you more control over how you select values during data entry.
Why It Matters for Your Business
- Improves user experience when working with long or complex record lists
- Allows faster selections or more detailed searches based on the context
- Supports a more tailored interface for different modules and teams
How to Use It (Fast Overview)
- Go to Settings > Preferences > Custom Fields
- Create or edit a lookup custom field
- Under Display Type, choose one of the following:
- Dropdown View – ideal for quick selections from short lists
- List View – better for browsing or searching through detailed or longer lists
- Currently supported in modules like:
- Items
- Vendors
- Purchase Orders
- Customers
Goldstar’s Take
This change gives power users more control over their forms. Whether you’re managing hundreds of vendors or just a short list of items, you can now fine-tune the input method for speed or detail.
What You Should Do Next
- Review your existing lookup fields across supported modules
- Choose Dropdown View for compact, fast entries
- Use List View for more in-depth selection needs
Generate Serial Numbers in Inward Transactions
Zoho Inventory now supports serial number generation for inward transactions. You can define a starting serial number and the required count to automatically generate a sequence — saving time and improving traceability.
To generate serial numbers, select an item from the item table, click Add Serial Numbers, then select Generate Serial Numbers. Enter the starting value and count, then click Generate.
Why It Matters for Your Business
- Eliminates manual entry of serial numbers during stock inwarding
- Ensures accurate and consistent serial tracking
- Saves time when receiving items in bulk
How to Use It (Fast Overview)
- During an inward transaction (e.g., purchase receive or item receipt), choose a serialised item
- In the serial number field:
- Enter a starting serial number (must end in a numeric value)
- Specify how many serials to generate
- Zoho will auto-create a sequence like
ABC001,ABC002,ABC003, etc.- Stock on Hand – your total physical inventory
- Available for Sale – adjusted for committed or reserved stock
Note: The starting serial number must always end with a number (e.g., SN100, INV001, etc.
Goldstar’s Take
This is a great time-saver for warehouse and inventory teams, especially when receiving serialised items in batches. It also reduces the chance of entry errors and improves traceability during audits.
What You Should Do Next
- Try this feature the next time you process a serialised inward transaction
- Standardise a serial format across your team for consistency
- Validate your existing serialised items to align with the numeric-ending requirement
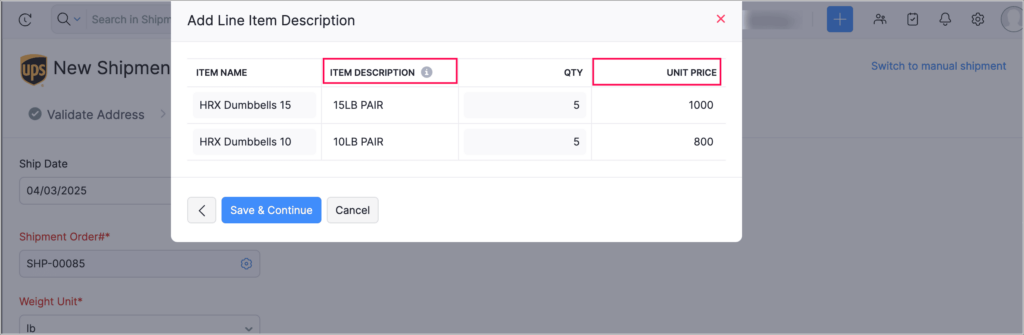
Item Description for UPS Line Items
Zoho Inventory has enhanced the UPS Paperless Invoice feature, allowing you to add and edit item descriptions and unit prices per line item within a package. Previously, a single description covered all items — now, each line can be uniquely detailed.
Note that this feature is only available in UPS shipment integrated organisations.
Why It Matters for Your Business
- Offers greater clarity in international shipments and customs declarations
- Helps prevent package holds or clearance issues due to vague descriptions
- Enhances transparency for both logistics partners and end customers
How to Use It (Fast Overview)
- When preparing a UPS Paperless Invoice:
- Go to the package content section
- For each item, you can now:
- Edit the description
- Set a unit price independently
- This gives you the flexibility to tailor each line item’s details for accuracy
Goldstar’s Take
This is a smart update for businesses that ship diverse items in one package. Providing line-level clarity not only keeps you compliant but also avoids costly customs delays.
What You Should Do Next
- Review your current UPS package workflows
- Start customising item descriptions and prices per line to improve shipment accuracy
- Ensure your logistics or shipping team is aware of this enhancement
Enhanced Shopify Integration
Zoho Inventory’s Shopify integration just got smarter and more flexible. You can now configure sync settings per store, manage item and order syncing preferences, and get clearer insights through filtered sync history.
To integrate Shopify with Zoho Inventory, go to Settings > Integrations & Marketplaces > Shopify
Why It Matters for Your Business
- Gives more granular control over how and when data syncs from each Shopify store
- Prevents data mismatches by allowing separate mapping and tax handling
- Improves sync visibility with detailed status filtering
- Supports businesses running multiple Shopify storefronts with tailored needs
How to Use It (Fast Overview)
- Per-Store Sync Configuration:
- Set sync frequency and mapping options individually for each Shopify store
- Item Sync Enhancements:
- Runs every 24 hours by default
- Option to trigger manually when needed
- Sales Order Sync:
- Choose a start date for syncing
- Set the sync frequency
- Decide whether to:
- Import orders under a single customer, or
- Create new customers using fields like email or name
- Non-Taxable Items:
- Are now correctly created with tax exemption status
- Sync History Improvements:
- New filters for sync type and status
- Easily view successful and failed sync attempts
Goldstar’s Take
These enhancements are perfect for ecommerce teams juggling multiple Shopify stores. Independent store sync and smart mapping options mean fewer errors and more operational control — all while saving time.
What You Should Do Next
- Leverage manual sync when testing changes or onboarding new products
- Review sync settings for each Shopify store and adjust them as needed
- Set up proper mapping rules for customer creation and tax handling
- Use the new filters in sync history to monitor and troubleshoot integration issues
Edit Etsy Orders
You can now edit Etsy orders fetched into Zoho Inventory. Previously locked fields like item details and tax are now editable, giving you more flexibility to manage and align incoming orders with your organisation’s settings.
To integrate Etsy, go to Settings > Integrations & Marketplaces > Etsy
Why It Matters for Your Business
- Fix or adjust Etsy order details without having to cancel and re-import
- Apply your organisation’s configured tax rates instead of relying on Etsy’s default
- Ensures consistency across all sales channels
How to Use It (Fast Overview)
- When an order is imported from Etsy, open it in Zoho Inventory
- You can now:
- Edit item details (e.g., name, quantity, price)
- Override tax rates based on your organization’s tax configuration
Goldstar’s Take
This change is great for teams syncing Etsy with Zoho but needing the flexibility to standardise tax handling or clean up order data. It removes the friction that came with non-editable imports.
What You Should Do Next
- Communicate the update to your ecommerce and finance teams for alignment
- Review your existing Etsy order imports to identify any needing corrections
- Set up your organisation’s default tax rates to ensure proper application
Batch Tracking Enhancements
Batch Tracking in Zoho Inventory has received a significant upgrade, offering greater flexibility and control. From creating batches on the fly to enhanced return tracking and audit visibility — managing batch-based inventory is now much easier.
Why It Matters for Your Business
- Improves stock accuracy by aligning returns with the original sold batch
- Simplifies batch creation and editing directly from the item record
- Provides better control over batch lifecycle and visibility
- Strengthens audit compliance with full batch history tracking
How to Use It (Fast Overview)
- Create/Edit Batches directly from the Item Details Page
- Return to Sold Batch: When processing returns, items can go back to the same batch they were sold from
- Shared Batch for Line Items: Use the same batch across multiple line items in purchase transactions
- Batch Status Control:
- Mark batches as Inactive
- Prevents further transactions while still showing in reports
- Audit Trail Report now logs:
- Batch creation
- Edits
- Restocks
- Transfers
Goldstar’s Take
This update delivers exactly what fast-moving inventory operations need — precision, visibility, and control. The return-to-batch feature alone will drastically reduce stock inconsistencies in batch-sensitive industries.
What You Should Do Next
- Begin managing batches from the Item Details screen for convenience
- Train your returns team to use the return-to-sold batch feature
- Use batch inactivation to phase out expired or discontinued stock without deleting records
- Review the Audit Trail regularly for full batch movement transparency
Pin Columns in Transaction List Page
You can now include both the Item Description and Unit Price in the line items of a UPS paperless invoice generated through Zoho Books. This gives more clarity to the shipping documents and ensures compliance with customs and carrier requirements.
To pin columns, go to any module, click the Customise Columns icon, hover over the fields, click the Pin icon, and then click Save.
Note that this feature is only available in UPS shipment integrated organisations.
Why It Matters for Your Business
- Helps you stay focused on key identifiers like customer names, invoice numbers, or dates
- Enhances readability in wide views with many columns
- Reduces context switching when comparing or reviewing data
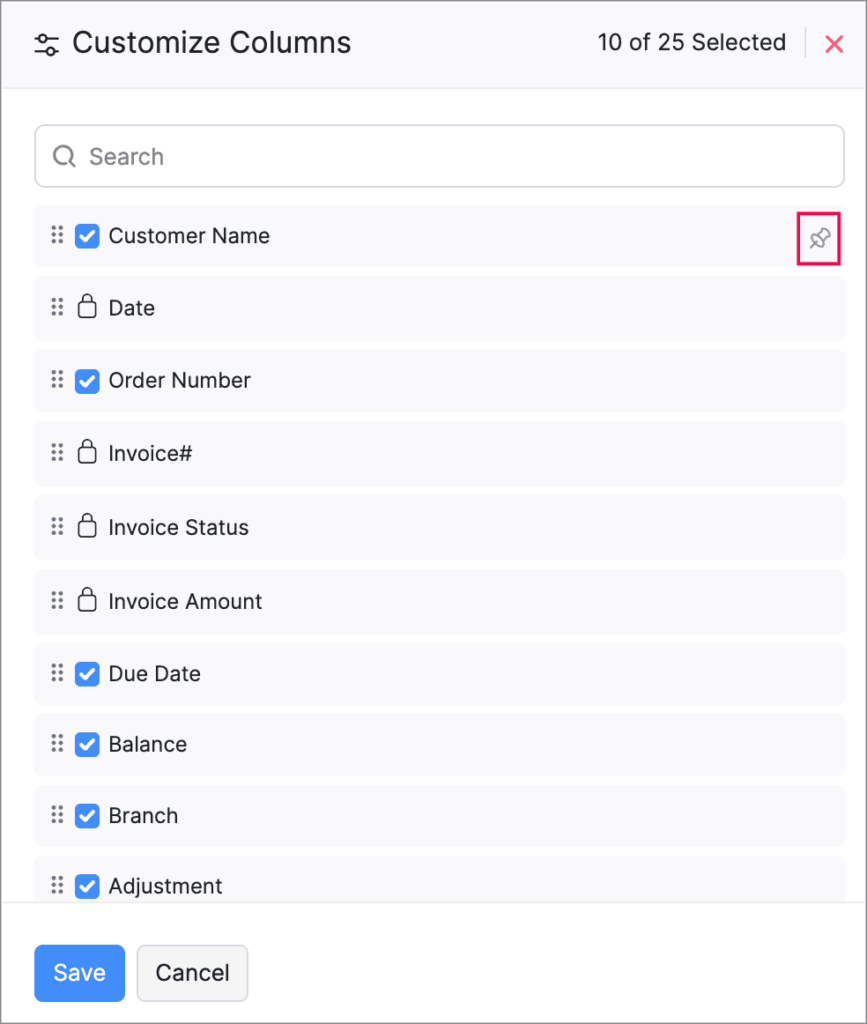
How to Use It (Fast Overview)
- Navigate to any transaction list view (e.g., Invoices, Sales Orders, etc.)
- Ensure the view has more than 8 columns
- Hover over a column header and select the pin icon to lock it in place
- You can pin up to two columns at a time
Goldstar’s Take
This small but mighty feature is a big win for power users managing complex data. Pinning the right columns can drastically reduce visual clutter and improve data efficiency.
What You Should Do Next
- Identify which columns are critical for your team (e.g., Customer Name, Order Number)
- Customise your views and try pinning them for better usability
- Share this tip with teams working in high-volume transaction modules
Clone Delivery Challans
Zoho Inventory now lets you clone delivery challans, making it easy to duplicate existing documents and save time on repetitive entries.
To clone a delivery challan, go to Delivery Challans, select a challan, click the More icon, and select Clone from the dropdown.
Why It Matters for Your Business
- Speeds up the process for recurring or similar deliveries
- Reduces manual errors from re-entering the same details
- Streamlines your logistics documentation
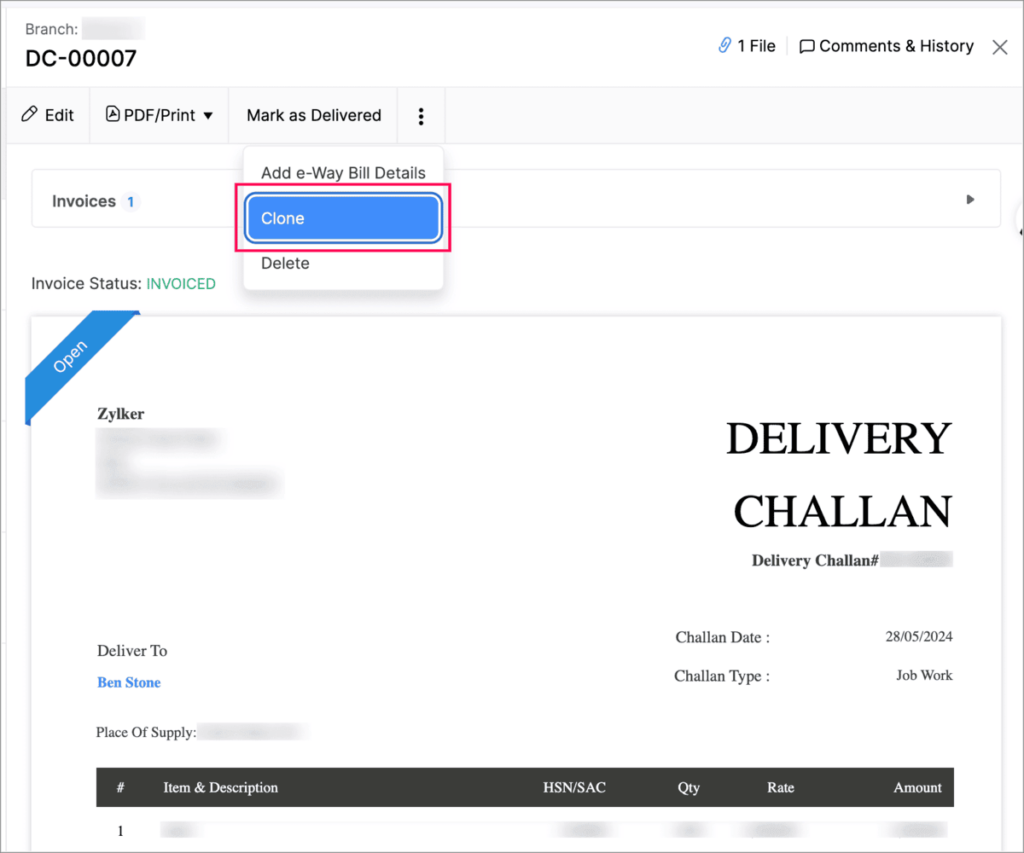
How to Use It (Fast Overview)
- Open an existing Delivery Challan
- Click the More button (three dots menu)
- Select Clone to create a new challan with the same details
- Make any edits if needed and save
Goldstar’s Take
This is a practical quality-of-life update for fulfillment teams. Cloning helps maintain accuracy and speeds up document prep — especially useful for repeat customers or recurring shipments.
What You Should Do Next
- Start cloning challans for repeat delivery scenarios
- Train warehouse and logistics staff on this shortcut
- Review your recent delivery documents and identify patterns where cloning can save effort
Enhanced Export and Print Preferences for Reports
Zoho Inventory now offers more customisation options for exporting and printing reports. You can personalise file names, control header visibility on PDFs, and organise grouped data into cleaner layouts.
Why It Matters for Your Business
- Ensures exported reports are easier to identify and file
- Improves readability in printed and PDF versions of lengthy reports
- Makes grouped report data easier to review and share
How to Use It (Fast Overview)
- Go to any report and click Export or Print
- New customisation options include:
- Custom file name for exports (e.g., “Sales_Q1_2025”)
- Display column headers on every page of PDF reports
- Group-by field page breaks – start each group on a new page
Goldstar’s Take
These upgrades bring clarity and polish to your reporting workflows. Whether you’re sharing reports internally or with clients, the extra formatting control goes a long way in professionalism and usability.
What You Should Do Next
- Customise your export file names for better organisation
- Enable header repetition on PDFs for multi-page reports
- Use page breaks for grouped reports to improve clarity and navigation
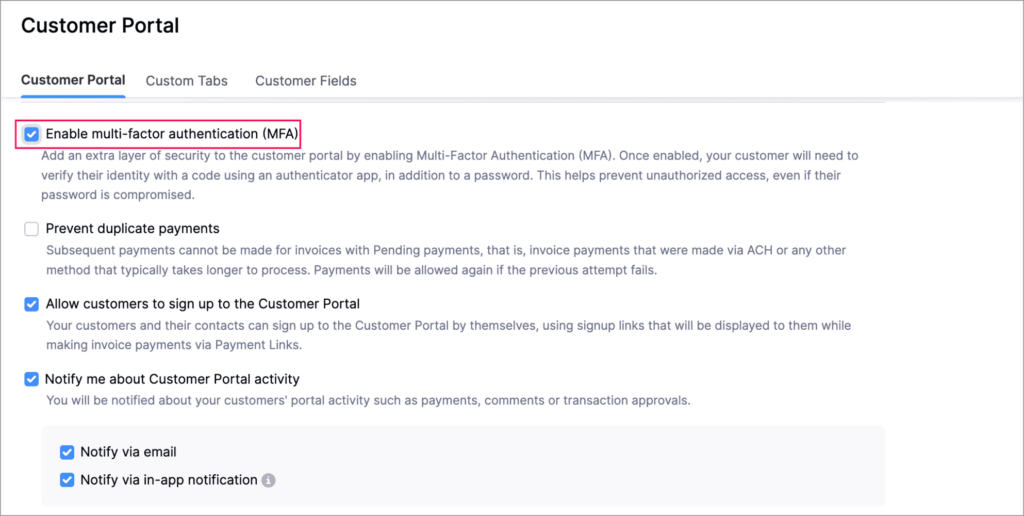
Multi-Factor Authentication (MFA) for Portals
Zoho Inventory now supports Multi-Factor Authentication (MFA) for both Customer and Vendor Portals. This adds a secure verification step using Time-Based One-Time Passwords (TOTP) in addition to regular login credentials.
To enable multi-factor authentication for your customers and vendors, go to Settings > Preferences > Customer Portal. Check the Enable multi-factor authentication (MFA) option.
Why It Matters for Your Business
- Strengthens access security for external users accessing your portals
- Reduces risk from compromised passwords
- Gives admins greater control over user authentication
How to Use It (Fast Overview)
- Go to Customer Portal Settings in Zoho Inventory
- Enable Multi-Factor Authentication
- Customers and vendors will be prompted to set up MFA using an authenticator app
- After setup, users must enter a TOTP code at each login
- Admins can:
- Reset MFA for users if needed
- Note: If MFA is later disabled, users who previously set it up will still need to enter a TOTP
⚠️ If a user loses access to their authenticator app, they must contact an admin to reset MFA.
Goldstar’s Take
This is a vital update for any business handling sensitive or high-value data through portals. It reduces the threat of unauthorised access and ensures peace of mind for you and your customers/vendors.
What You Should Do Next
- Enable MFA in your Customer and Vendor Portal settings
- Inform portal users and guide them on setting up an authenticator app
- Be ready to assist with MFA resets in case of lost access
Import Move Orders and Putaways
Zoho Inventory now supports data import for both Move Orders and PutAway modules. This allows for faster bulk updates and streamlined record creation directly from external files.
To import move orders and putaways, go to Transfer Orders/Putaways under Inventory > Click More in the top right corner > Import Transfer Orders/Putaways.
Why It Matters for Your Business
- Saves time by allowing mass entry of warehouse movement and storage data
- Reduces manual errors in inventory operations
- Makes it easier to migrate or sync data from other systems or spreadsheets
How to Use It (Fast Overview)
- Go to the Move Orders or PutAway module
- Click on the Import option
- Upload your data file (CSV, XLS, etc.) following the provided template
- Map fields as required and review before importing
Goldstar’s Take
This import feature fills a big efficiency gap for warehouse teams. Whether you’re onboarding new records or managing high-volume item movements, importing saves countless hours over manual entry.
What You Should Do Next
- Prepare import files using Zoho’s template for Move Orders and PutAways
- Use this option to catch up on backlogs or when rolling out new storage processes
- Train relevant team members to use the import process for smoother operations
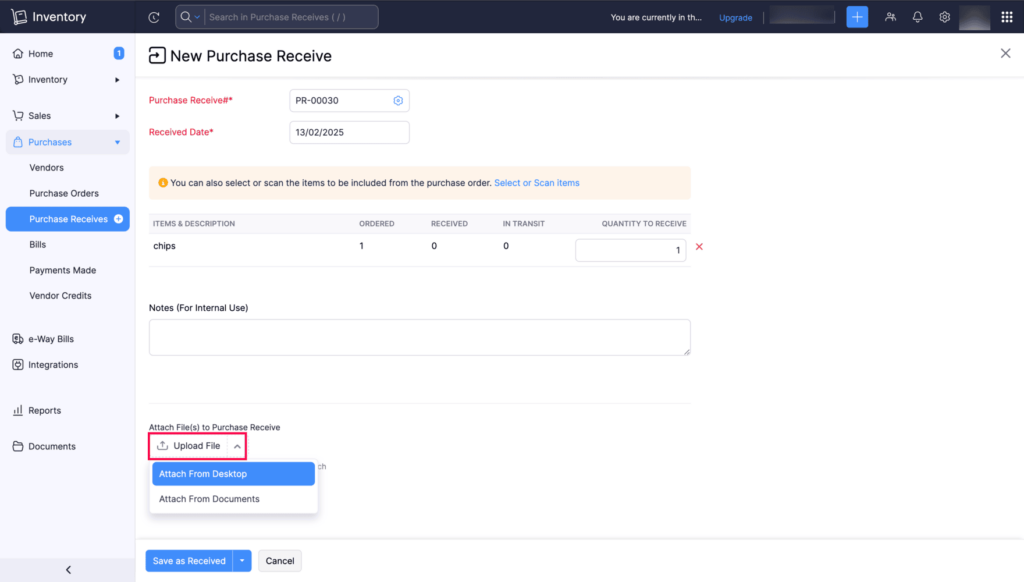
Attach Documents in Purchase Receives
You can now upload, attach, and manage documents directly from the Purchase Receive creation and edit pages in Zoho Inventory. This simplifies documentation and centralises related files.
To attach a document in purchase receive, go to Purchases > Purchase Receives > + New > Upload File.
Why It Matters for Your Business
- Keeps all supporting documents (like invoices or delivery slips) in one place
- Reduces back-and-forth between modules or external storage
- Enhances traceability and audit readiness
How to Use It (Fast Overview)
- Create or edit a Purchase Receive
- Use the Attachments section to:
- Upload files from your system
- View or manage existing documents
- Supported formats include PDFs, images, and other common file types
Goldstar’s Take
Attaching documents at the point of entry keeps your workflow tight and tidy. It’s especially useful for businesses needing to reference supplier paperwork or proof of delivery.
What You Should Do Next
- Begin attaching key documents to all new Purchase Receives
- Review past records and upload missing files where relevant
- Align your procurement and inventory teams on this new workflow
Print and PDF Support for Purchase Receives
Zoho Inventory now allows you to generate, print, and download Purchase Receives. A standard PDF template is also available to make record-keeping simpler and more consistent.
To print or download a purchase receive, go to Purchases > Purchase Receives. Select the purchase receive and click PDF/Print.
To view the PDF of a purchase receive, go to Purchases > Purchase Receives. Select the purchase receive and enable the Show PDF View option on its details page.
Why It Matters for Your Business
- Enables easy documentation and sharing of received goods
- Helps maintain clean, accessible audit trails
- Reduces dependency on external tools or manual record formats
🛠 How to Use It (Fast Overview)
- Open any Purchase Receive
- Use the Print or Download PDF options from the action menu
- The document will use a standard template designed for clarity and compliance
💡 Goldstar’s Take
This addition fills a key documentation gap. Whether you’re printing for internal use, archiving, or sending confirmations to suppliers, the new PDF support keeps everything neat and formalized.
📌 What You Should Do Next
- Start printing or saving PDFs of all Purchase Receives for record-keeping
- Use the standard format to unify how your procurement documentation is stored and shared
- Train your warehouse or receiving team to include this in their workflow
Filter Lookup Custom Fields
You can now filter lookup custom fields in Zoho Inventory by applying custom views and criteria. This ensures that only records matching your specified rules appear during selection.
Why It Matters for Your Business
- Reduces clutter by showing only relevant options in lookup fields
- Helps enforce better data accuracy and consistency
- Customises the user experience based on team workflows or record status

🛠 How to Use It (Fast Overview)
- Go to Settings > Preferences > Custom Fields
- Create or edit a lookup custom field
- Choose a Custom View and define filter criteria
- Only records that meet all specified conditions will be shown when using the lookup
💡 Goldstar’s Take
This update is great for tailoring forms to match real-world processes. For example, showing only active customers or available vendors in a lookup field reduces errors and speeds up data entry.
📌 What You Should Do Next
- Review your existing lookup fields
- Apply filters to limit the options shown based on relevant criteria
- Test custom views to streamline form-filling across different teams
Leave Organisation Option
You can now leave an organisation directly from the Manage Organisations page in Zoho Inventory. This offers more flexibility for users managing multiple organisations.
Why It Matters for Your Business
- Makes it easier for users to manage and clean up their organisation access
- Reduces clutter when switching between multiple orgs
- Enhances account control without needing admin intervention (in most cases)
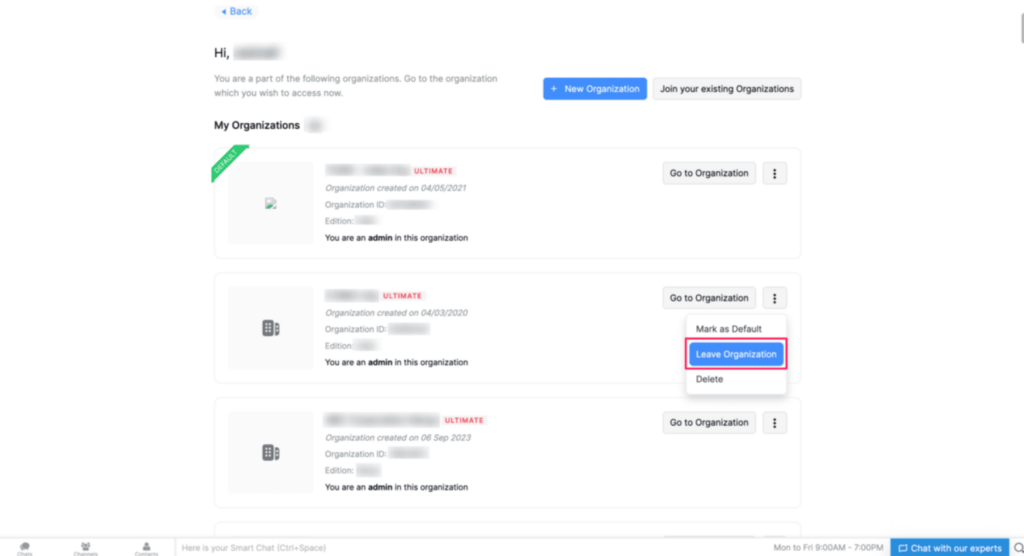
How to Use It (Fast Overview)
- Go to Manage Organisations
- Click on the organisation you want to leave
- Choose Leave Organisation from the available options
Important Notes:
- If you’re the admin who created the organisation or the only admin, you cannot leave — you’ll need to delete the organisation instead
- Before leaving, ensure all integrations are disabled to prevent potential issues
Goldstar’s Take
This is a thoughtful addition for account hygiene, especially for users who test features in multiple orgs. The safety checks for sole admins are a smart safeguard against accidental orphaning of accounts.
What You Should Do Next
- Review your current organisations under your account
- Leave any test or inactive organisations you no longer need
- If you’re the only admin, plan deletion or transfer of ownership before attempting to leave
As we conclude this Zoho Inventory update April 2025, we’re excited to see how these enhancements can streamline your financial management processes and improve overall efficiency.
We invite you to explore these new features and discover how they can simplify your workflows, increase efficiency, and drive business growth. Should you have any questions or need further assistance why not book a meeting with our experts.